Access Management
By default, when you set up your Shieldoo Secure Network, all network nodes (users and servers) can access each other.
The default setup might be sufficient for your solution. If not, advanced users can utilize the Expert Mode to secure the traffic passing between the network and its nodes (users and servers):
Enable the Expert Mode to gain access to all the access management features.

- Learn what you can accomplish using the access management features in the Access Management Example section.
- Configure the access management features to suit your security needs:
Access Management Example
The following schema shows an example scenario you can configure using Shieldoo’s access management features:

Developer - Demonstrates a user needing access to both services running on the resource server.
The developer has an access card that does the following:
- Maps the user to the Database and Messaging groups.
- Assigns a custom firewall to the user, blocking any inbound traffic and allowing any outbound traffic.
Application Server - Demonstrates a server that runs a web application that needs access to the database running on the resource server.
The application server has an access card that does the following:
- Maps the server to the Database group.
- Assigns a custom firewall to the server, blocking any inbound traffic and allowing any outbound traffic.
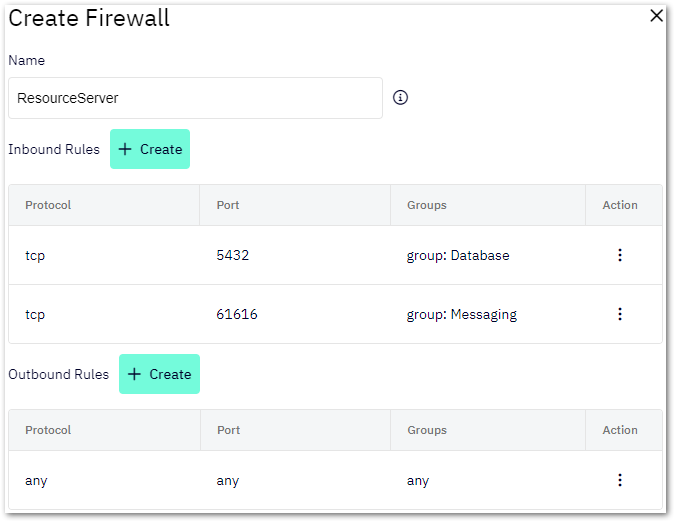
Resource Server - Demonstrates a server that runs two services other servers or users need to access.
The resource server has an access card that does the following:
- Maps the server to the Database and Messaging groups.
- Assigns a custom firewall to the server, allowing any outbound traffic and blocking all the inbound traffic except for the following ports:
- 5432 - Only users or servers in the Database group can access it.
- 61616 - Only users or servers in the Messaging group can access it.
Groups
A group in a Shieldoo Secure Network is a mechanism that maps specific firewall rules to specific users or servers.
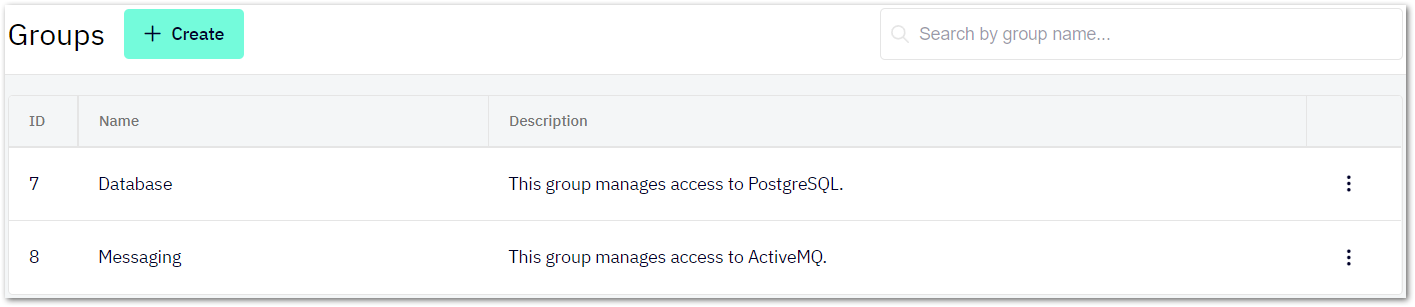
A group alone does not do any mapping. It only indicates what type of access the group will manage. Firewalls and Access Cards will use created groups to do the mapping.
Creating Groups
The following steps describe how to create groups:
- Log in to your organization’s Shieldoo Secure Network web application.
- Enable Expert Mode.
- Go to the Network | Groups section.
- Click on the Create button to open the Create Group dialog.
- Configure the group settings:
- Name - Give the group a descriptive name.
- Description - Describe the group’s purpose.
- Click the Create button to confirm the group’s creation.
- Continue by Creating Firewalls, utilizing the created groups.
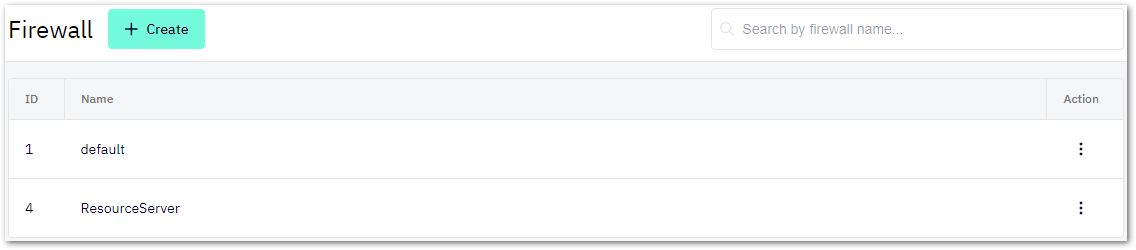
Firewalls
A firewall in a Shieldoo Secure Network configures rules that determine which traffic can pass between the network and its nodes (users and servers).
Creating Firewalls
The following steps describe how to create firewalls:
- Log in to your organization’s Shieldoo Secure Network web application.
- Enable Expert Mode.
- Go to the Network | Firewall section.
- Click on the Create button to open the Create Firewall dialog.
Configure the firewall settings:
- Name - Give the firewall a descriptive name.
- Inbound Rules - Filter traffic passing from the network to a node (user or server).
- Outbound Rules - Filter traffic from a node (user or server) to the network.
- Learn how to configure the firewall rules in the Configuring Firewall Rules section.
- Click the Create button to confirm the firewall’s creation.
- Continue by creating Access Cards to map the created firewall rules to specific nodes (users or servers).
By default, a user can be accessed by another user or by a server.
We highly recommend that you secure the users in your network with a specific firewall. Learn how to do that in the Securing Users section.
Configuring Firewall Rules
This section describes the settings of the Create Rule dialog:

- Port - Define the port of the service for which you want to configure the given firewall rule.
- Protocol - Define a specific protocol to be allowed:
- Access for - Select which group you want to map to the given rule:
- Any group - Defines that any user or server can access the port.
- Specific groups - Use the provided Groups combo box to select the groups whose users or servers can access the given port.
If you map a rule to a group called Database, only users or servers mapped (in their Access Cards) to that group will be able to access the given port.
Access Cards
An access card in a Shieldoo Secure Network maps firewall rules and groups to specific servers or users. In other words, it determines which services users or servers can access within the network.
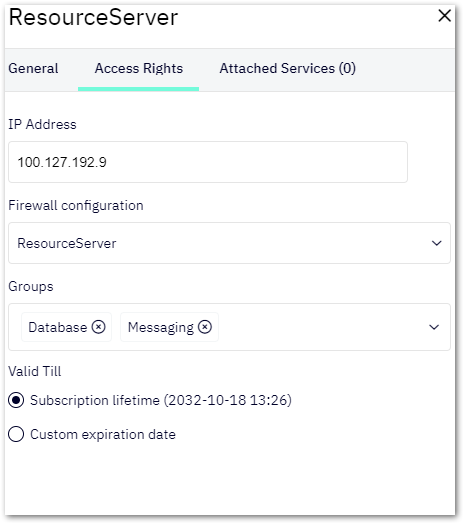
Creating Server Access Cards
The following steps describe how to create access cards for servers:
- Log in to your organization’s Shieldoo Secure Network web application.
- Enable Expert Mode.
- Go to the Network | Servers section.
- Open the server’s context menu for which you want to create an access card.
- Click on Edit to open the server’s settings.
- Go to the Access Rights tab where the access card is configured.
- Configure the access card settings:
- IP Address - Skip this setting unless the IP address of the given server has changed since you created it.
- Firewall configuration - Select one of the prepared firewalls.
- Groups - Map the server with all the desired groups.
- Valid Till - Define how long the access card will remain valid:
- Subscription lifetime - Defines that the access card will remain valid if your organisation subscribes to Shieldoo.
- Custom expiration date - Defines a custom expiration using the provided date picker.
- Click the Save button to confirm the access card’s creation.
Creating User Access Cards
The following steps describe how to create access cards for users:
- Log in to your organization’s Shieldoo Secure Network web application.
- Enable Expert Mode.
- Go to the Network | Users section.
- Open the context menu of the user for whom you want to create an access card.
- Click on Detail to open the Access control tab.
- Click on the Create Access Card button.
- Select one of the following options:
- From scratch - Configure the access card manually.
The user access card settings are simplified to the server access card settings. - From template - Select a prepared user access card template.
You can prepare user Access Card Templates.
- From scratch - Configure the access card manually.
Access Card Templates
Access Card Templates simplify the creation of user Access Cards, either ad-hock or when using the invite user feature in Expert Mode.
To following steps, describe how to create and configure Access Card Template:
- Log in to your organization’s Shieldoo Secure Network web application.
- Enable Expert Mode.
- Go to the Network | Access Card Templates section.
- Click on the Create button to open the Create Access Card Template dialog.
- Configure the Access Card Template settings:
- Name - Select the name of the template.
- Firewall configuration – Select one of the prepared firewalls.
- Groups – Map the user with all the desired groups.
- Valid till - Defines how long the access card will remain valid (Subscription lifetime or Custom length).
- Description - Possibility to write a note.
- Click the Create button to confirm the Access Card Template creation.
A default Access Card Template is created in the settings of each Shieldoo Secure Network. In basic Admin mode, this template creates a user access card when the invited user to the network. The default Access Card Template cannot be deleted for this reason, but you can modify its settings.
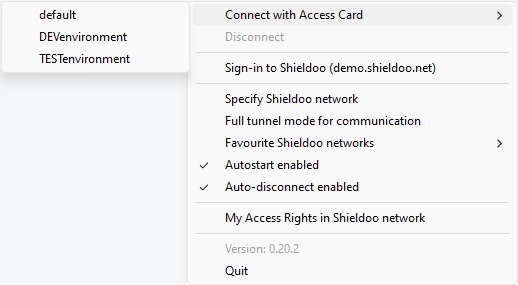
Connecting to Shieldoo Using an Access Card
When an administrator configures an access card for a user, Shieldoo forces the user to connect to the network under its restrictions.
If multiple access cards are available to a users, they can select which access card they want to use when connecting to the network.
The access cards become available to users as connection profiles in the context menu of Shieldoo’s system tray icon.